
Advice › Soundproofing Basics
Soundproofing Basics: the 3-layer method
For the best results, use two or three layers of different materials. Each one deals with a different kind of noise: first stop the metal vibrating, then insulate, then absorb what’s left.
The layers at a glance
- Layer 1Sound deadening matsStraight onto bare metal. Stop panels vibrating and drumming.
- Layer 2Sound & thermal insulationST-Mat or PPE ECO foam. Keeps heat in or out, decouples trim from the metal to stop buzzes, and seals the panel against condensation.
- Layer 3Acoustic felt or foamAbsorbs the remaining noise inside the cabin. Dry areas only.
- ExtraAnti-squeak tapesStop plastic trim creaking and rattling.
Layer 1: Sound deadening mats
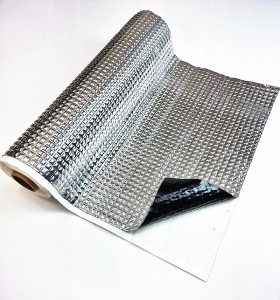
Self-adhesive butyl-rubber mats with an aluminium foil face. They go directly onto the metal panels and stop them vibrating and drumming, which lowers the noise the bodywork itself makes. The thicker the mat, the more damping, but also the more weight, so use the thick mats where most noise comes in.
| Mat | Best for |
|---|---|
| 1.5mm | Lightest mat: doors, roof and bonnet, where weight and space are tight. |
| 2mm | All-round mat: roof, doors, boot lid, van side panels and wheel arches. Also on a 4 m roll for big panels. |
| 3mm | Heavy-duty: floor, boot floor, engine bulkhead and wheel arches. |
| 4mm | Most damping: floor, transmission tunnel and wheel arches. |
Roll every mat down firmly with a metal roller. Mats only work when they’re fully bonded, with no air pockets. Cover at least 50% of each panel.
Knock test: tap the bare panel with your knuckle. Where it rings or sounds hollow, it needs a mat. Start in the centre of the largest flat areas (they vibrate most) and use the biggest pieces that fit. Tap again: when it sounds dull, like a wooden table top, that panel is done. 50 to 60% coverage is usually plenty; go closer to 100% only for maximum results.
Weight: thicker mats add noticeable weight, and a full van takes a lot of mat. In vans, use the thick mats only where they matter most (arches, the floor around the arches, the bulkhead).
Layer 2: Sound & thermal insulation
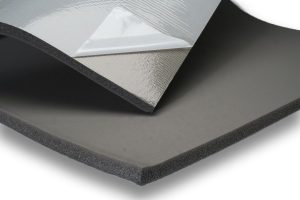
ST-Mat is a self-adhesive closed-cell rubber foam that gives sound and thermal insulation in one layer. It’s water-resistant, moisture-proof and fire-retardant, and it follows curved van panels. It comes 1 m wide in 3, 6, 10, 19 and 25mm.
What closed-cell foam does and doesn’t do: it’s a thermal insulator and a decoupler (it stops trim and metal touching and buzzing). It’s too light to block noise on its own; noise blocking needs a heavy mass layer. Most of the noise reduction comes from Layer 1 (damping the metal) and Layer 3 (absorbing what’s left).
| ST-Mat | Where InShop uses it |
|---|---|
| 3mm | Under a plywood floor without battens (with ST-Mat, use only 3mm here). |
| 6mm | Van door frames, over 1.5mm mat. Strips between corrugated floor ribs. |
| 10mm | Side panels, wheel arches, and under the bonnet. |
| 19/25mm | Campervan walls and roofs where there’s depth, or between floor battens. |
PPE ECO foam is a lightweight, self-adhesive closed-cell polyethylene that’s water- and oil-resistant. It’s a light insulating layer and is best on flat surfaces: 4mm fits behind most trim, 8mm gives more insulation for floors, and 8mm with metal foil adds some radiant-heat reflection for campervan walls, floors and roofs.
Layer 3: Acoustic felt or acoustic foam
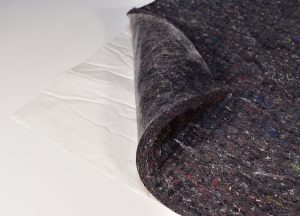
The final layer absorbs the noise that’s left inside the cabin. Both options are self-adhesive and are for dry areas only.
- 8mm acoustic felt: absorbs airborne noise and adds thermal insulation
- 12mm acoustic felt: more absorption; stack layers to fill deeper gaps
- Autoshim acoustic foam: cuts echo and high-frequency road noise behind trim
Extra: stop squeaks and rattles
When you refit the trim, tape the contact points. Madelin tape (1mm felt) fits tight joints between plastic parts; Black Layer tape (5mm foam) seals between plastic trim and the body around dashboards, door panels and roof liners.
Not every project needs all three layers, and they won’t always be practical. See our project examples to plan what suits your vehicle.
Which product for which job?
What InShop recommends for each area, based on the product pages and our own projects. Click a product to see sizes and prices.
Doors
- Layer 1
- 1.5mm mats on the inside of the door skin and on the inner metal partition.
- Layer 2
- 6mm ST-Mat over the mat inside the door, where there is space.
- Layer 3
- 12mm acoustic felt on the door card, over 1.5mm mat.
- Rattles
- Black Layer tape or Madelin tape on door panels and trim clips.
Keep the door’s drain holes at the bottom clear, and leave room for the window glass, regulator and lock rods: wind the window fully up and down before you refit the trim. Don’t cover airbag modules, yellow SRS connectors or wiring plugs. On cars, refit the plastic water shield behind the door card (or seal the access holes with mat), so felt on the door card stays dry. Felt is for dry areas only, so keep it out of the inside of the door skin.
Floors
- Layer 1
- Car floor: 4mm or 3mm mats. A corrugated van floor usually needs no mat: the ribs already stiffen it. Knock-test any large flat areas (often around the wheel arches) and add mat where they drum.
- Layer 2
- Car floor: 8mm PPE ECO foam on the flat areas. Van floor under plywood: 3mm ST-Mat only, unless you fit battens (see the tip).
- Layer 3
- 12mm felt on the transmission tunnel and back-seat area.
ST-Mat is a soft rubber foam, so under a plywood floor laid straight on it, keep it to 3mm: thicker soft foam compresses over time and the ply rocks and creaks. For more insulation, fill between the corrugated ribs with ST-Mat strips cut to rib height and cover the whole floor with 3mm, or fit battens and put thicker ST-Mat between them. Avoid screwing through the floor metal; prime and paint any hole you do drill, so it doesn’t rust.
Roof
- Layer 1
- 2mm or 1.5mm mats. Less noise comes from the roof, so thinner mats are fine. For a big van roof, the 2mm roll means fewer joins.
- Layer 2
- Campervan: 19 or 25mm ST-Mat where you have the depth, or 8mm foil-faced PPE ECO.
- Layer 3
- 8mm acoustic felt (used on an InShop roof project over 2mm mat) or Autoshim acoustic foam.
Wheel arches & side panels
- Layer 1
- Most van road noise comes from here, so use thicker mats: 2mm (InShop van project), or 3mm / 4mm for the most damping.
- Layer 2
- 10mm ST-Mat inside the side panel and over the arches.
- Layer 3
- 12mm felt on inner wheel arches inside the cabin, or Autoshim foam behind the interior wheel-arch trims (never on the outer arch liners). Dry areas only.
Boot
- Layer 1
- Boot floor: 3mm or 4mm mats. Boot lid: 2mm mats.
- Layer 2
- 4mm or 8mm PPE ECO foam on flat areas.
- Layer 3
- 8mm felt in the luggage area (if the spare-wheel well gets damp, use closed-cell foam there instead), Autoshim foam on the boot lid.
Bonnet
- Layer 1
- 1.5mm mats: light, so they suit the bonnet.
- Layer 2
- 10mm ST-Mat on the underside of the bonnet skin, as InShop did on a vintage car.
Heat: keep foam well away from the exhaust manifold, turbo and anything that gets very hot, and keep it clear of the bonnet catch and hinges. Fire-retardant doesn’t mean fireproof. On an overhead panel, back up the adhesive with bonnet-liner clips so heat can’t make it drop. On modern cars with hot engine bays, use a foil-faced engine-bay liner instead.
Full van conversion
- Layer 1
- 2mm roll for side panels and roof, 2mm sheets on the arches. Cover at least 50% of each panel.
- Layer 2
- ST-Mat: 10mm on side panels and arches, 19 or 25mm on walls and roof, 3mm on the floor. Or foil-faced PPE ECO on flat walls, floor and roof.
- Layer 3
- Felt or acoustic foam behind the trim, in dry areas.
Condensation: in a van, warm moist air from breathing and cooking condenses on cold metal. Closed-cell foam (ST-Mat, PPE ECO) protects the metal only if it’s bonded fully, with no air pockets behind it, and each piece is butted tight against the next. Don’t add a plastic vapour barrier behind or over it, because it can trap water. Fit a roof vent or fan and use it. Don’t use fibreglass or loft wool against the metal.
As a rough guide, a short-wheelbase van typically uses about 4 to 8 m² of mat and about 10 m² of foam; a long-wheelbase van about 8 to 12 m² of mat and 15 to 20 m² of foam. Mats go on about 50% of each panel; foam goes on 100% of the main panels. Measure the areas you want to cover and send them to us. We’ll help you work out how much you need.
How much do I need?
Measure each area you want to cover (length × width = m²), then use the table.
| Product | Size | Covers | Per m² |
|---|---|---|---|
| Sound deadening mats (all thicknesses) | Small 0.50 × 0.35 m Big 0.50 × 0.70 m | 0.175 m² 0.35 m² | about 5.7 small or 2.9 big |
| 2mm sound deadening roll | 0.5 × 4 m | 2 m² | half a roll |
| ST-Mat | 1 m wide, per metre | 1 m² per unit | 1 unit |
| PPE ECO foam (4mm, 8mm, 8mm foil) | 750 × 500 mm | 0.375 m² | about 2.7 sheets |
| Acoustic felt (8mm, 12mm) | 800 × 500 mm | 0.40 m² | 2.5 sheets |
| Autoshim acoustic foam | 500 × 500 mm | 0.25 m² | 4 sheets |
Sound deadening mats don’t need 100% coverage: covering 50 to 60% of each panel gives a noticeable result, so for mats you can multiply the panel area by about 0.6. Foam and felt go on the whole area, so add 10 to 15% for offcuts. ST-Mat comes as one continuous piece, so 3 units = one 3 m × 1 m length.
Save money: put mats in the centre of large flat panels, not into small, stiff corners. Skip mats on a corrugated van floor. Use the 2mm roll or big sheets on van sides and roof. One layer of a proper butyl mat beats two layers of anything. Avoid bitumen flashing tape and foil bubble-wrap: they don’t damp well and break down with heat.
Ready to fit? Follow the step-by-step guide, or see how we did it on real vans and cars.
- Stocked in KilkennyShipped from our premises at Hebron Industrial Estate
- Ships immediatelyIn-stock orders placed before 3pm Mon–Fri leave the same day · Delivery
- Trade customers welcomeApply for a trade account
- Help on WhatsApp+353 83 088 8713 · Mon–Fri 10am–5pm